Tips for the Treasure Hunt: Shopping for Unique Decor at Antique Malls, Thrift Stores and Markets
What to look for at markets, antiques and thrift stores to create unique original decor, and favorite shops in the vicinity of Raleigh, NC
Posted in: art and decorating
What to look for at markets, antiques and thrift stores to create unique original decor, and favorite shops in the vicinity of Raleigh, NC
Let’s call this “artsy upcycling” . . . simple projects to create quick, easy and inexpensive decor that’s completely unique to you.
Creating a nature-themed gallery in a small space — ideas and DIY projects
Looking for a specific theme, style or color? Simple decoupage crafts allow you to create custom art and decor easily for just a few dollars. Here are ideas for inspiration and a tutorial.

Valentines Day — do you love it, hate it, or are you indifferent? At this stage of my life, I fall mostly into the latter category. (Although I will never object to flowers or chocolate.) But I love the heart — that ubiquitous symbol of love which you just can’t escape in February. We automatically associate the heart with romantic love, but its appealing shape often shows up in places that have nothing to do with Valentines Day. The heart has come to represent “love” in the most general sense and lends itself to all kinds of applications — everything from being just a pretty decorative motif to a very expressive emoji.
So how did this particular shape come to be the universally accepted metaphor for human emotion? Explanations vary, but one consistent rumor places a fennel-like plant, the Silphium, in the ancient mediterranean world where it was recognized as an effective contraceptive. (I guess when steeped and drunk as a tea?) The Silphium seed pod formed a perfect heart shape and was a rare and valuable trade commodity. The North African city central to the Silphium trade featured a heart-shaped emblem on its currency. The plant was extinct by the first century AD, but it’s not hard to see the connection between the heart-shaped seeds used for contraception and the association of the shape with romantic love. Although It wasn’t until the Renaissance that the heart became a widely used symbol for the emotions of love and affection, and in religious connotations, the sacred love of Christ.

Hearts decorate the mantel in my kitchen in January and February.
I keep an art journal for experimenting with mixed-media techniques. A page can be completed fairly quickly and I think of it simply as note taking for my own use. I frequently use the heart shape when I’m trying to get a sense of the effects a technique offers — you can do just about anything with it and it’s still recognizable as a heart. (Flowers work well that way too, but that’s another topic.) The picture below shows some pages from my current journal. The photo on the bottom left shows one page that I divided into four parts to try different methods of layering paper and paint.

We often associate the heart with the home — think of expressions like, “Home is where the Heart is” and the kitchen as being “the heart of the home.” Hearts offer a warm and whimsical decorative touch and are adaptable for styles from traditional to modern. Below are instructions for two easy DIY projects that you can use to bring hearts into your own home. While I’m a huge fan of the color pink, most of the hearts that decorate my house are in a neutral palette as shown in these projects. But hearts work in any color, so feel free to follow your own muse.

Gather your supplies and prepare your canvas with either paint or fabric (see note above).
Make a heart template on paper. Size it to fit comfortably on the canvas.
Make your collage: take a used dryer sheet (you may need to iron the sheet to smooth it out first) and apply paper scraps in a random pattern to cover the sheet. You can brush glue on to each piece of paper or coat the sheet with the glue and then press the paper onto the surface. Either way, make sure the paper is thoroughly glued down to the sheet (place the dryer sheet on wax paper to prevent getting glue on your table surface).
Brush a thin coat of glue over the surface of your collage and allow it to dry.
Once the collage has dried, flip the dryer sheet over and trace your heart template on the back. Cut out the heart shape.
To attach the collage to the canvas, brush glue to cover the back side of your heart and carefully place it in position. Lightly press on the heart and use a damp paper towel or sponge to wipe off excess glue that seeps from the sides.
Place a piece of wax paper over the collaged canvas and then a book on top of the wax paper. Allow the collage to dry over night. Add a saw-tooth picture hanger on the top back side of the canvas if you want to hang it, or simply prop the canvas up on a shelf.
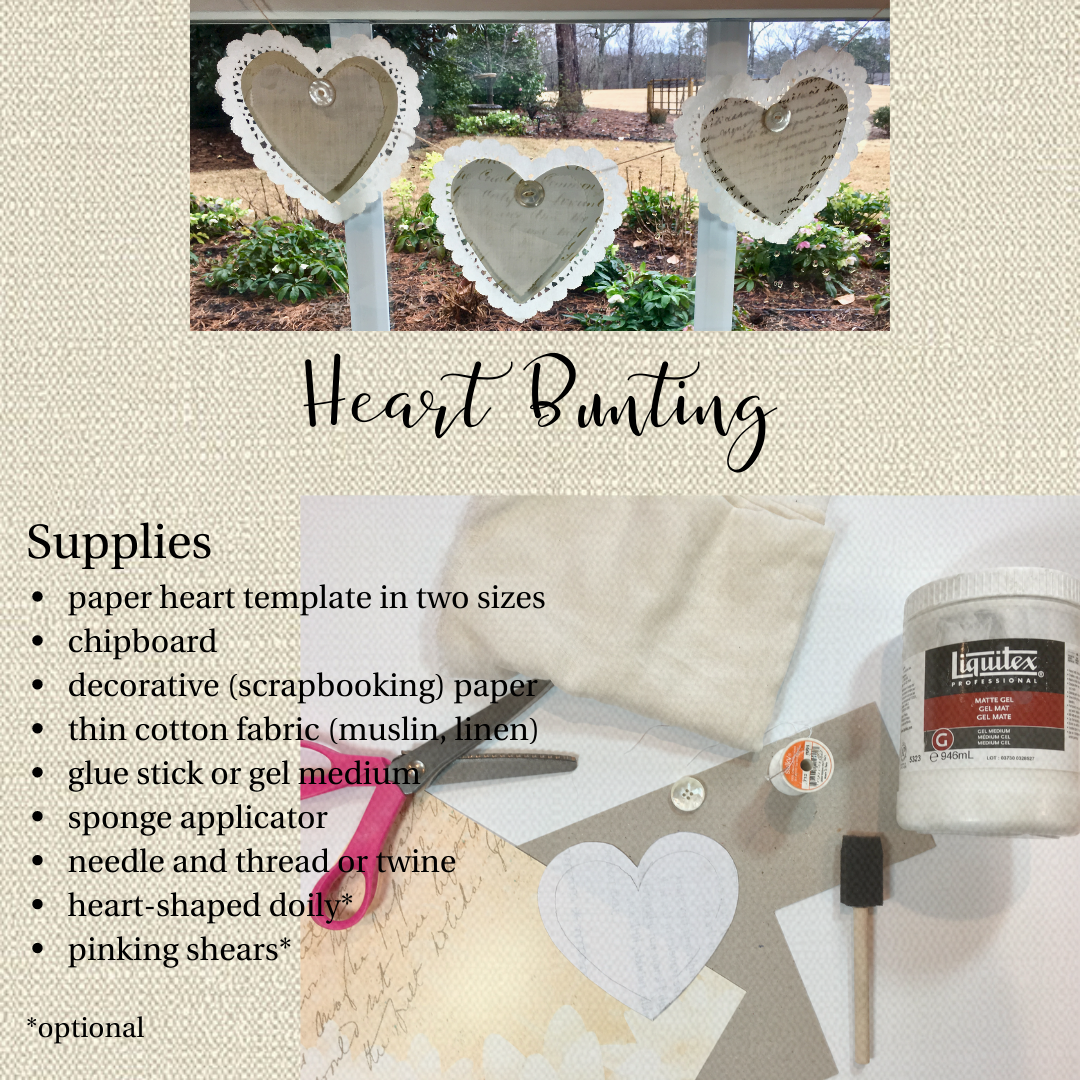
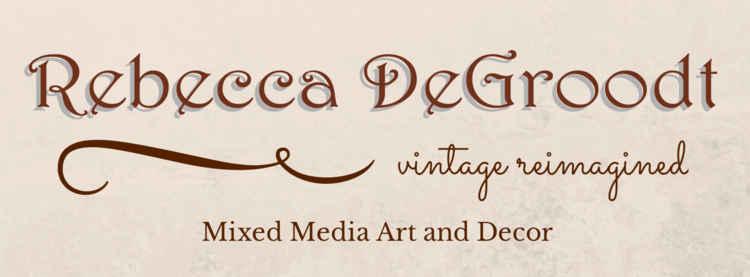
Gather your supplies. If you can find heart-shaped doilies, they’re cute — but not essential. You can use heavy string or thin twine. Twine hangs better but you will need to make sure the eye of your needle is large enough to thread the twine through.
Create heart templates in two sizes, one slightly smaller than the other.
Cut a heart shape from your chipboard using the larger heart template. Using the same template, cut a heart from your decorative paper.
Brush a thin coat of glue on the chipboard heart and lightly press the decorative paper heart on top, lining up the edges. Gently press the two pieces together and wipe excess glue from the sides with a damp paper towel or sponge.
Using the smaller template, cut a heart shape from your fabric. Using pinking shears adds a decorative edge to the fabric, but is optional.
If you are using doilies, glue the chipboard heart to the doily and allow to dry.
Repeat this process for as many hearts as you would like to have in your bunting.
Lay the chipboard hearts in a line and match each with a fabric heart. You may want to use a dab of glue to secure the fabric heart to the paper heart.
Place a button at the top of each heart, in the crevice. Push the needle from the back of your first heart through one hole of the button. Draw the thread and needle through the other hole to the backside of the heart. Repeat this process using the same long piece of thread or twine for each heart. (See tip below. ) Leave enough of a thread or twine “tail” at the start and end of your bunting to use for hanging.


When we remodeled and enlarged our house two years ago we added a laundry room. Previously — in our circa 1970 house, the laundry had been in the garage. A lot of thought went into planning this space because it needed to have multiple functions. It’s for the laundry, but also acts as a butler’s pantry and extension of the adjacent studio space. I wanted a large table in the center, a stainless steel sink and lots of cabinetry. (I may have overcompensated slightly for having done laundry in the garage for a decade, but it’s now one of the most useful spaces in the house.)
I also had an aesthetic feel in mind for this space. I’ve always loved 1920’s and 30’s style, particularly the kitchens, but the look is very different from what’s going on in the rest of our house. So this space would be dedicated to that era’s style (if not appliances.) There are some very distinctive blues that appear in illustrations and decor from that time, a robin’s egg blue but also a darker shade — maybe you would call it a “Dutch” blue. I had the cabinet maker paint the cabinets in a custom blended color reminiscent of that darker blue. I left some of the shelves open to display glass jars, vintage ceramics and tins. I knew that I would frame and hang pages from a 1920’s Royal Baking Company recipe booklet that belonged to my grandmother in a gallery wall, but there are two large wall spaces that needed art.

Laundry Day by J.C. Spock
Scrolling through Instagram early last spring I saw that mixed media artist J.C. Spock had posted a new series of collages called Life in the 30’s. Her work features a washed out mostly monochromatic palette often with swatches of faded sky blues. I immediately fell in love a collage featuring a black and white photograph of women hanging out laundry. What could be more perfect for my laundry room? But a 6x6 panel could not carry an entire wall, so I had the pleasure of creating a small collection of pieces to complete the grouping.

Elements for Housekeeping2: The Oak Park
I have a Dover reproduction of a Sears Roebuck House catalog and had wanted to create a collage based around one of the illustrations for a long time, the housekeeping theme I was working with provided the perfect opportunity. Silhouettes of a maid from an advertisement in an old Ladies Home Journal magazine, a dollhouse broom and dustpan set, a bit of a hand-stitched linen napkin, a button card with just one precious mother of pear diamond button remaining and other small pieces of ephemera completed the piece. The elements are blended into a cohesive whole with washes of milk and mineral paints that with their mat and somewhat granular consistency suggest old plaster.
Next up, a tiny toy iron I picked up on an antiquing excursion. In kind of rough shape, it seems to have been well loved and pairs nicely with a black and white photo of little girls ironing doll clothes. Another silhouette ties this piece to the first collage and looms like a shadow of the mother the girls are imitating and a roll they will most likely fill in adulthood. I used a small wood tray picked up at a local thrift shop as the substrate for this shadowbox.

Laundry Day by J.C. Spock, Housekeeping 1:The Oak Park, collage on basswood panel and Housekeeping 2: Ironing, shadowbox assemblage

Elements for A Chicken Story
These two pieces with the JC Spock collage made a complete but small grouping that really only filled one side of the wall. Time for some chicken art! I had an old children’s book illustration that I’d been saving for just the right piece. The colors leant themselves to a painted blue frame; and since keeping chickens was common in early 20th century households, the subject complimented my period “homemaking” theme. I paired the illustration with a happy chicken family (from my stash of vintage figurines) on the inside of a basswood artist panel. As a companion to this shadowbox-type assemblage, I created a collage inspired by JC Spock. I made a semi-transparent transfer of an old photograph as the central image, and added bits of period textiles and text and illustrations from a children’s dictionary and old agricultural magazines. This piece is on a stretched canvas panel.
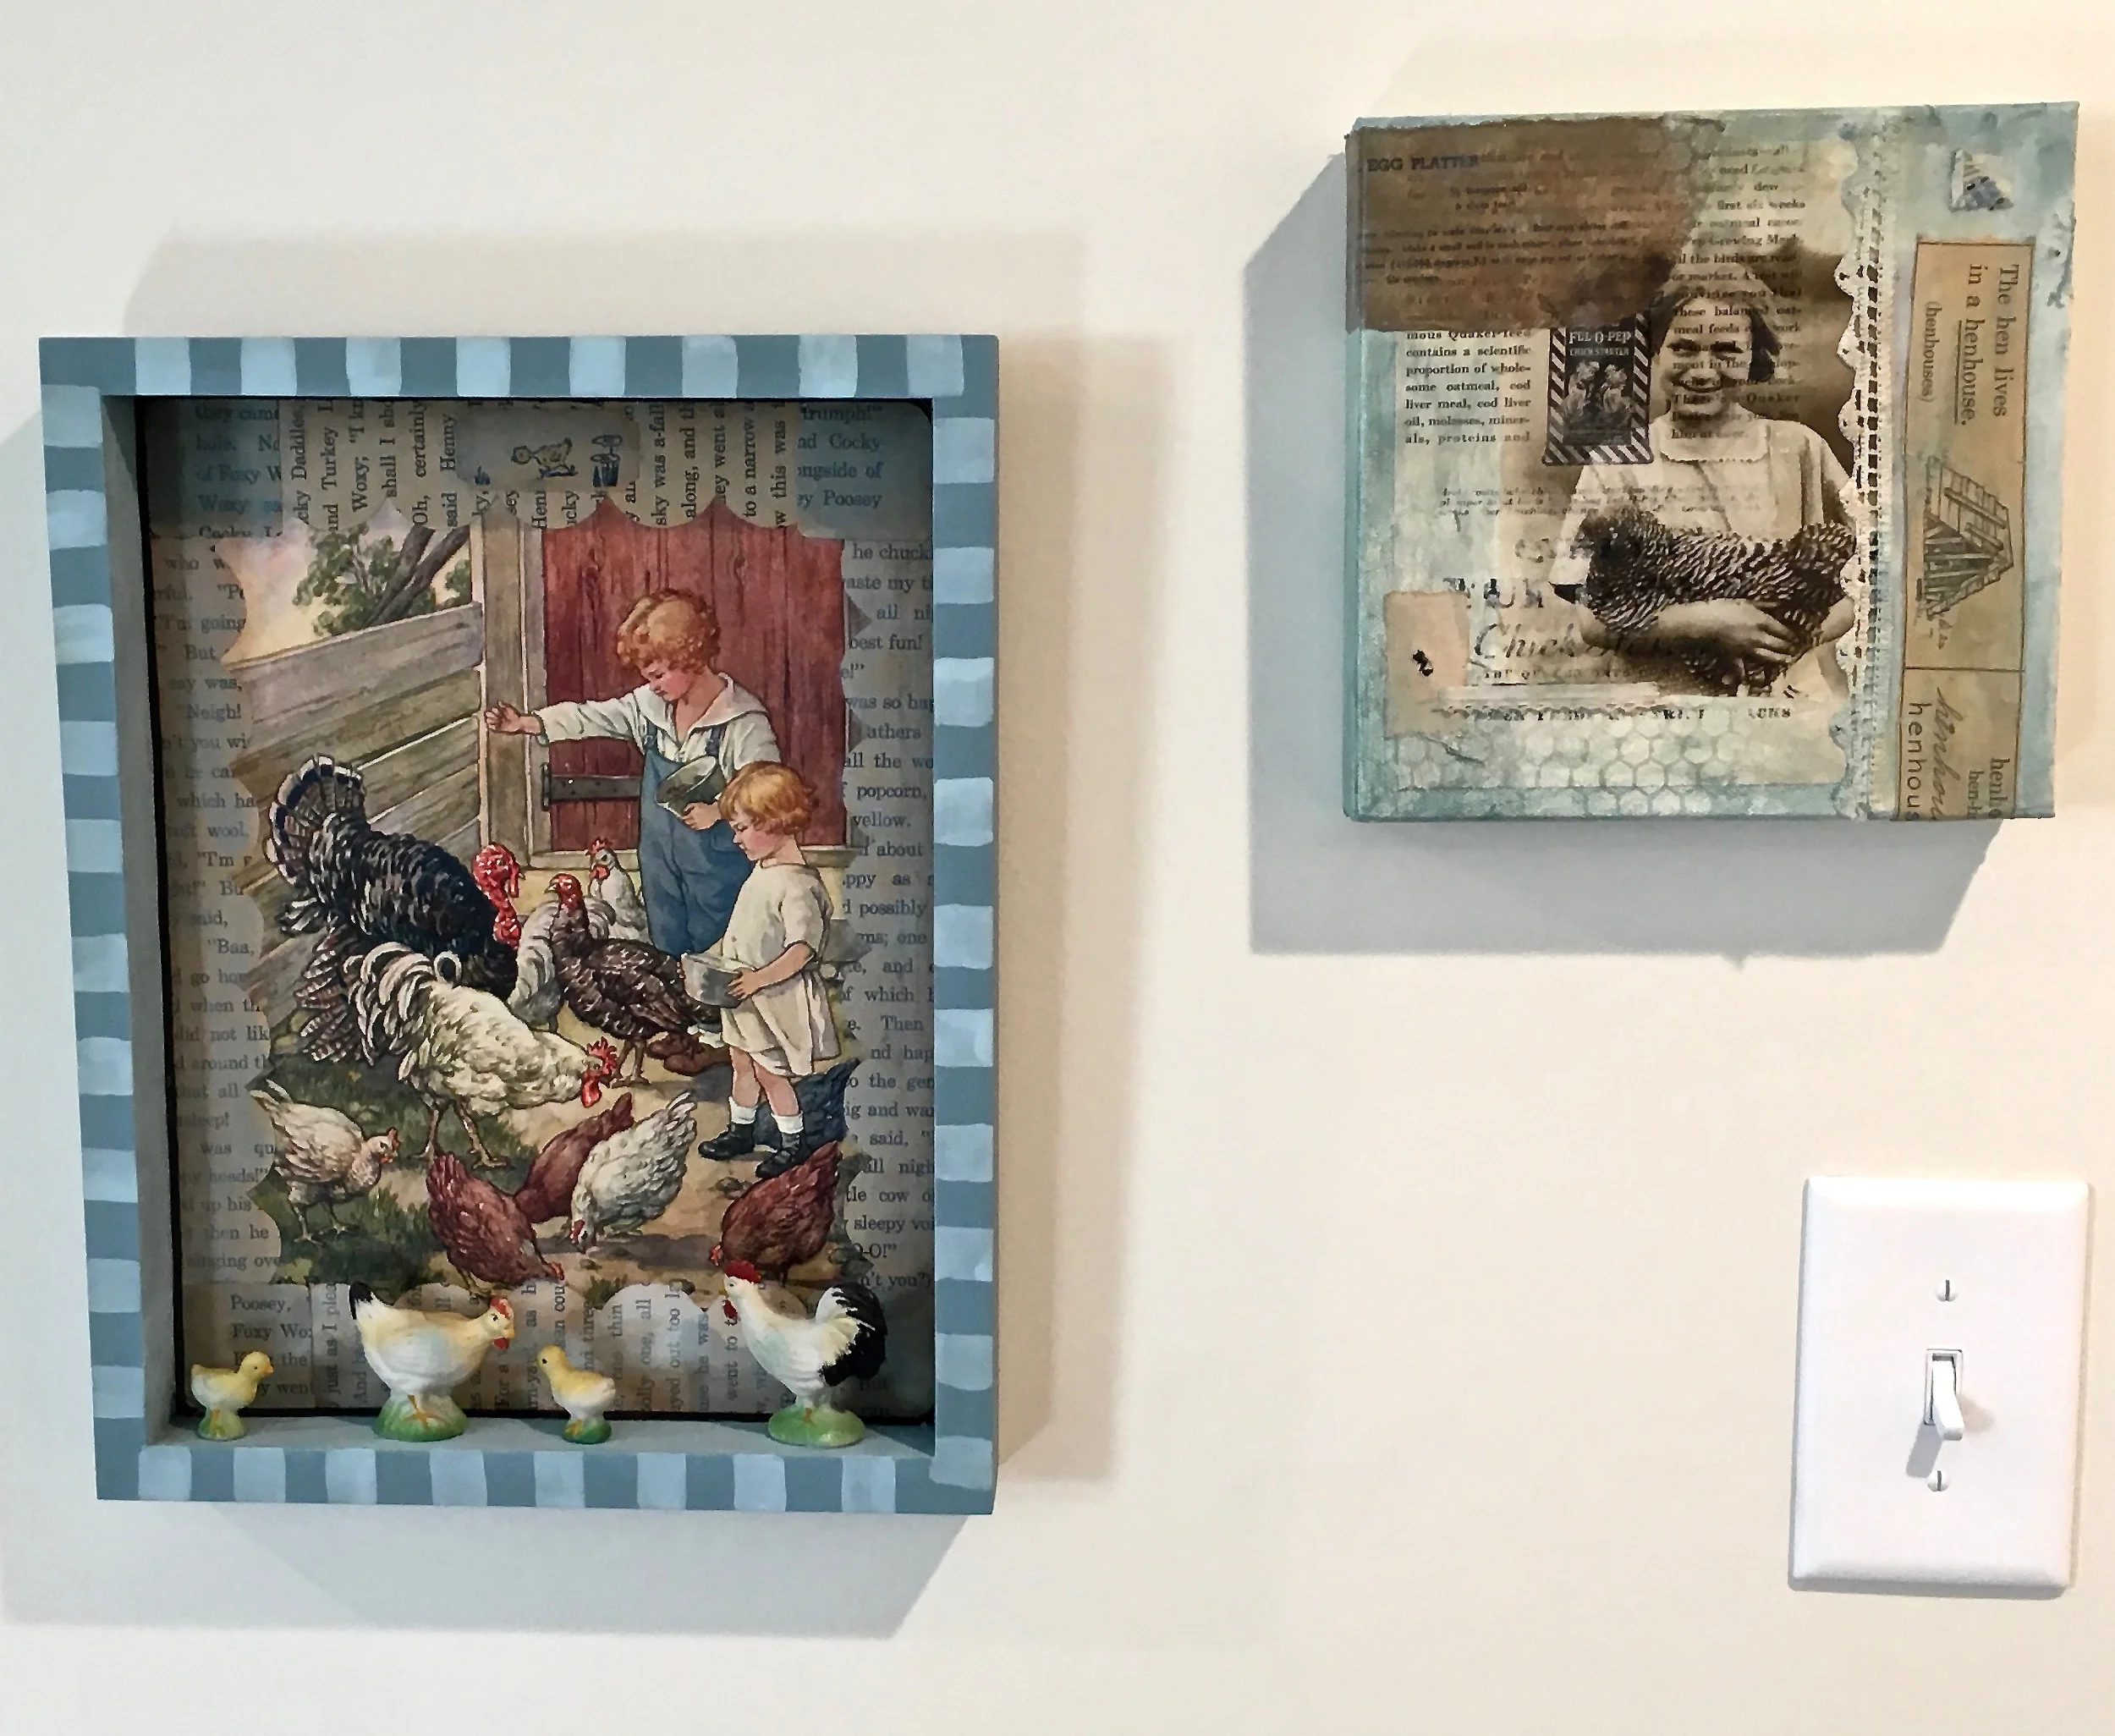
A Chicken Story, shadowbox assemblage and Girl with Chicken, collage on canvas

In the center of the this wall is a built-in, fold-down ironing board. which was also a common feature in early 20th century homes in the kitchen. It makes the board easily accessible but out of the way — very convenient.
And that completes one wall. I was going to include the second gallery wall in this post — the one inspired by my grandmother’s 1920’s promotional recipe booklet, but this post has already gotten kind of long. So I’ll save that for another time. The takeaway?
(In future posts I’ll go step by step through some simple projects for doing it yourself.)

Our girls, the feathered ones anyway