Create a Very Special Gift or Personal Art Piece with a Shadow Box
A shadowbox is a great way to showcase a small memento or photo that might otherwise get stuck away out of sight and out of mind.
Posted in: craft tutorial
A shadowbox is a great way to showcase a small memento or photo that might otherwise get stuck away out of sight and out of mind.
Let’s call this “artsy upcycling” . . . simple projects to create quick, easy and inexpensive decor that’s completely unique to you.
Looking for a specific theme, style or color? Simple decoupage crafts allow you to create custom art and decor easily for just a few dollars. Here are ideas for inspiration and a tutorial.
Drawing flowers is another way to enjoy them; and by “drawing” I mean a simple doodle. Here’s how…
Some ideas and techniques for making handmade books to use as journals and gifts.

Valentines Day — do you love it, hate it, or are you indifferent? At this stage of my life, I fall mostly into the latter category. (Although I will never object to flowers or chocolate.) But I love the heart — that ubiquitous symbol of love which you just can’t escape in February. We automatically associate the heart with romantic love, but its appealing shape often shows up in places that have nothing to do with Valentines Day. The heart has come to represent “love” in the most general sense and lends itself to all kinds of applications — everything from being just a pretty decorative motif to a very expressive emoji.
So how did this particular shape come to be the universally accepted metaphor for human emotion? Explanations vary, but one consistent rumor places a fennel-like plant, the Silphium, in the ancient mediterranean world where it was recognized as an effective contraceptive. (I guess when steeped and drunk as a tea?) The Silphium seed pod formed a perfect heart shape and was a rare and valuable trade commodity. The North African city central to the Silphium trade featured a heart-shaped emblem on its currency. The plant was extinct by the first century AD, but it’s not hard to see the connection between the heart-shaped seeds used for contraception and the association of the shape with romantic love. Although It wasn’t until the Renaissance that the heart became a widely used symbol for the emotions of love and affection, and in religious connotations, the sacred love of Christ.

Hearts decorate the mantel in my kitchen in January and February.
I keep an art journal for experimenting with mixed-media techniques. A page can be completed fairly quickly and I think of it simply as note taking for my own use. I frequently use the heart shape when I’m trying to get a sense of the effects a technique offers — you can do just about anything with it and it’s still recognizable as a heart. (Flowers work well that way too, but that’s another topic.) The picture below shows some pages from my current journal. The photo on the bottom left shows one page that I divided into four parts to try different methods of layering paper and paint.

We often associate the heart with the home — think of expressions like, “Home is where the Heart is” and the kitchen as being “the heart of the home.” Hearts offer a warm and whimsical decorative touch and are adaptable for styles from traditional to modern. Below are instructions for two easy DIY projects that you can use to bring hearts into your own home. While I’m a huge fan of the color pink, most of the hearts that decorate my house are in a neutral palette as shown in these projects. But hearts work in any color, so feel free to follow your own muse.

Gather your supplies and prepare your canvas with either paint or fabric (see note above).
Make a heart template on paper. Size it to fit comfortably on the canvas.
Make your collage: take a used dryer sheet (you may need to iron the sheet to smooth it out first) and apply paper scraps in a random pattern to cover the sheet. You can brush glue on to each piece of paper or coat the sheet with the glue and then press the paper onto the surface. Either way, make sure the paper is thoroughly glued down to the sheet (place the dryer sheet on wax paper to prevent getting glue on your table surface).
Brush a thin coat of glue over the surface of your collage and allow it to dry.
Once the collage has dried, flip the dryer sheet over and trace your heart template on the back. Cut out the heart shape.
To attach the collage to the canvas, brush glue to cover the back side of your heart and carefully place it in position. Lightly press on the heart and use a damp paper towel or sponge to wipe off excess glue that seeps from the sides.
Place a piece of wax paper over the collaged canvas and then a book on top of the wax paper. Allow the collage to dry over night. Add a saw-tooth picture hanger on the top back side of the canvas if you want to hang it, or simply prop the canvas up on a shelf.
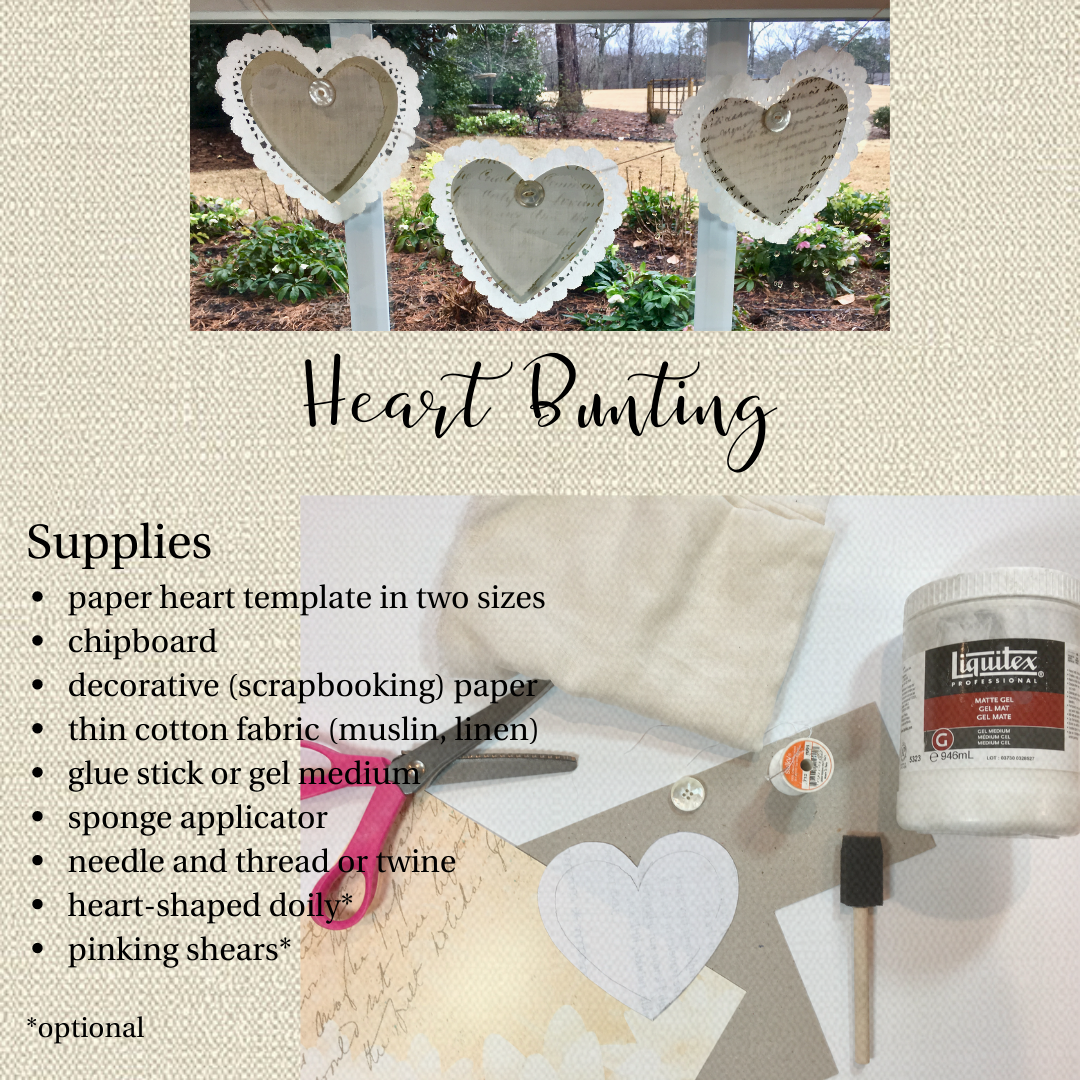
Gather your supplies. If you can find heart-shaped doilies, they’re cute — but not essential. You can use heavy string or thin twine. Twine hangs better but you will need to make sure the eye of your needle is large enough to thread the twine through.
Create heart templates in two sizes, one slightly smaller than the other.
Cut a heart shape from your chipboard using the larger heart template. Using the same template, cut a heart from your decorative paper.
Brush a thin coat of glue on the chipboard heart and lightly press the decorative paper heart on top, lining up the edges. Gently press the two pieces together and wipe excess glue from the sides with a damp paper towel or sponge.
Using the smaller template, cut a heart shape from your fabric. Using pinking shears adds a decorative edge to the fabric, but is optional.
If you are using doilies, glue the chipboard heart to the doily and allow to dry.
Repeat this process for as many hearts as you would like to have in your bunting.
Lay the chipboard hearts in a line and match each with a fabric heart. You may want to use a dab of glue to secure the fabric heart to the paper heart.
Place a button at the top of each heart, in the crevice. Push the needle from the back of your first heart through one hole of the button. Draw the thread and needle through the other hole to the backside of the heart. Repeat this process using the same long piece of thread or twine for each heart. (See tip below. ) Leave enough of a thread or twine “tail” at the start and end of your bunting to use for hanging.
