Tell Your Own Story (in a handmade book)
Some ideas and techniques for making handmade books to use as journals and gifts.
Some ideas and techniques for making handmade books to use as journals and gifts.


Wandering down the aisles of an antiques and vintage venue, I have my laser focus on. I’m scanning the shelves, tabletops and random piles for “my” things. As I’ve touched on before — this is a pretty broad category. But one of my all time favorites, sure to spark joy, is a sweet little doggie statue. They might be tiny Wade pottery “whimsies” or crude bisque figures of unknown provenance whose paint has all but worn away. I’m looking for a figure that tells me a story, that when I look at it I can immediately picture a setting, maybe a title, the kinds of adventures and misadventures this particular little charmer might have once and could still get up to.

Not Staffordshire Spaniels . . . this little box is simply stamped “Made in Japan” on the bottom and I would guess dates to the 1930’s or mid 1940’s.
Dogs seem to be as popular in replica as they are as pets. Potteries have been producing dog figurines since the 18th century. Staffordshire Spaniel pairs, de rigueur on the Victorian mantelpiece, are one example of how highly collectible dog figurines can be; a matched pair in good condition from the early 19th century is going to be pricey. Not the kinds of doggies I’m looking for. A much more affordable but still sought after collectible are figurines made in occupied Japan.
A Little History . . .
Japanese imports of ceramics (as opposed to fine china) began flooding the emerging mass market in the second half of the 19th century. In 1891 the McKinley Tariff Act required all imports to be marked in English spelling with the country of origin, in 1921 a new customs law required those marks to be in actual English. So items imported between 1891 and 1921 were stamped “Nippon” (Japanese for Japan). After 1921 and up until exporting ceased due to WWII in 1941, items were simply marked “Japan” or “Made in Japan”.
When the Allies defeated the Axis in 1945, General Douglas MacArthur was entrusted with reviving the Japanese economy. MacArthur focused on ramping up industry and mass-market exports were key to this effort. But the US market was not very receptive to items made by their former enemies, so the word “occupied” was added to the stamp. The occupation period extended from 1945 until 1952. While some figurines stamped simply “made in Japan” slipped through customs during this time, collectors are adamant about the “Occupied Japan” designation. It’s the stamp mark, not the figure itself that is collectible. But these collectibles tend to be very moderately priced, especially if they are under 8” tall — the most common size. In the picture below, the figure marked “Made in Occupied Japan” (actually a musician, another popular motif, not a dog) was $8.00 at an antique fair. Without the “Occupied” mark, it might have been $2 or $3.


Terriers were very popular breeds in the mid-twentieth century, both as pets and ceramic knick-knacks. This little decorative holder for — cards? a small plant? would probably have sold for under $1 at a five and dime.

Neither of these two figures has any kind of identifying mark, so it’s impossible to know when and where they were manufactured. The poodle (who is missing a paw) is made of a resin-like material. The puppy is ceramic, and given its scale, may have been marketed as a dollhouse miniature.
Low price points are very good news to me, since I’m gathering these little characters to play starring roles in mixed-media assemblage art, not as collectibles. I also pick up dog-themed ephemera (postcards, dye cuts) and embroidery to play supporting roles. This wool little boy’s suit is a good example. You can see in the picture that moths have done some damage, so it was only a few dollars. But the puppy dog-embroidered felt pockets and matching collar, too cute! I’m not sure yet exactly how I will use the fabric and embroidery in an assemblage, but it fit my theme too perfectly to pass up.

This series has been on my mind for so long, I’m very eager but also a little nervous to get started. Will the completed projects even come close to realizing my lively and abundant ideas? I’ve chosen seven figurines — well, one is a mother and puppies, so technically 11, for this first series. Each one will be placed in a three-dimensional, box-type assemblage. I’m making this my focus project for March. But given how long it’s taking me to complete the Sanibel-themed projects I started in January . . . well, fingers crossed this group will be done by June. Look for an update at the end of March, and wish me great productivity!


Valentines Day — do you love it, hate it, or are you indifferent? At this stage of my life, I fall mostly into the latter category. (Although I will never object to flowers or chocolate.) But I love the heart — that ubiquitous symbol of love which you just can’t escape in February. We automatically associate the heart with romantic love, but its appealing shape often shows up in places that have nothing to do with Valentines Day. The heart has come to represent “love” in the most general sense and lends itself to all kinds of applications — everything from being just a pretty decorative motif to a very expressive emoji.
So how did this particular shape come to be the universally accepted metaphor for human emotion? Explanations vary, but one consistent rumor places a fennel-like plant, the Silphium, in the ancient mediterranean world where it was recognized as an effective contraceptive. (I guess when steeped and drunk as a tea?) The Silphium seed pod formed a perfect heart shape and was a rare and valuable trade commodity. The North African city central to the Silphium trade featured a heart-shaped emblem on its currency. The plant was extinct by the first century AD, but it’s not hard to see the connection between the heart-shaped seeds used for contraception and the association of the shape with romantic love. Although It wasn’t until the Renaissance that the heart became a widely used symbol for the emotions of love and affection, and in religious connotations, the sacred love of Christ.

Hearts decorate the mantel in my kitchen in January and February.
I keep an art journal for experimenting with mixed-media techniques. A page can be completed fairly quickly and I think of it simply as note taking for my own use. I frequently use the heart shape when I’m trying to get a sense of the effects a technique offers — you can do just about anything with it and it’s still recognizable as a heart. (Flowers work well that way too, but that’s another topic.) The picture below shows some pages from my current journal. The photo on the bottom left shows one page that I divided into four parts to try different methods of layering paper and paint.

We often associate the heart with the home — think of expressions like, “Home is where the Heart is” and the kitchen as being “the heart of the home.” Hearts offer a warm and whimsical decorative touch and are adaptable for styles from traditional to modern. Below are instructions for two easy DIY projects that you can use to bring hearts into your own home. While I’m a huge fan of the color pink, most of the hearts that decorate my house are in a neutral palette as shown in these projects. But hearts work in any color, so feel free to follow your own muse.

Gather your supplies and prepare your canvas with either paint or fabric (see note above).
Make a heart template on paper. Size it to fit comfortably on the canvas.
Make your collage: take a used dryer sheet (you may need to iron the sheet to smooth it out first) and apply paper scraps in a random pattern to cover the sheet. You can brush glue on to each piece of paper or coat the sheet with the glue and then press the paper onto the surface. Either way, make sure the paper is thoroughly glued down to the sheet (place the dryer sheet on wax paper to prevent getting glue on your table surface).
Brush a thin coat of glue over the surface of your collage and allow it to dry.
Once the collage has dried, flip the dryer sheet over and trace your heart template on the back. Cut out the heart shape.
To attach the collage to the canvas, brush glue to cover the back side of your heart and carefully place it in position. Lightly press on the heart and use a damp paper towel or sponge to wipe off excess glue that seeps from the sides.
Place a piece of wax paper over the collaged canvas and then a book on top of the wax paper. Allow the collage to dry over night. Add a saw-tooth picture hanger on the top back side of the canvas if you want to hang it, or simply prop the canvas up on a shelf.
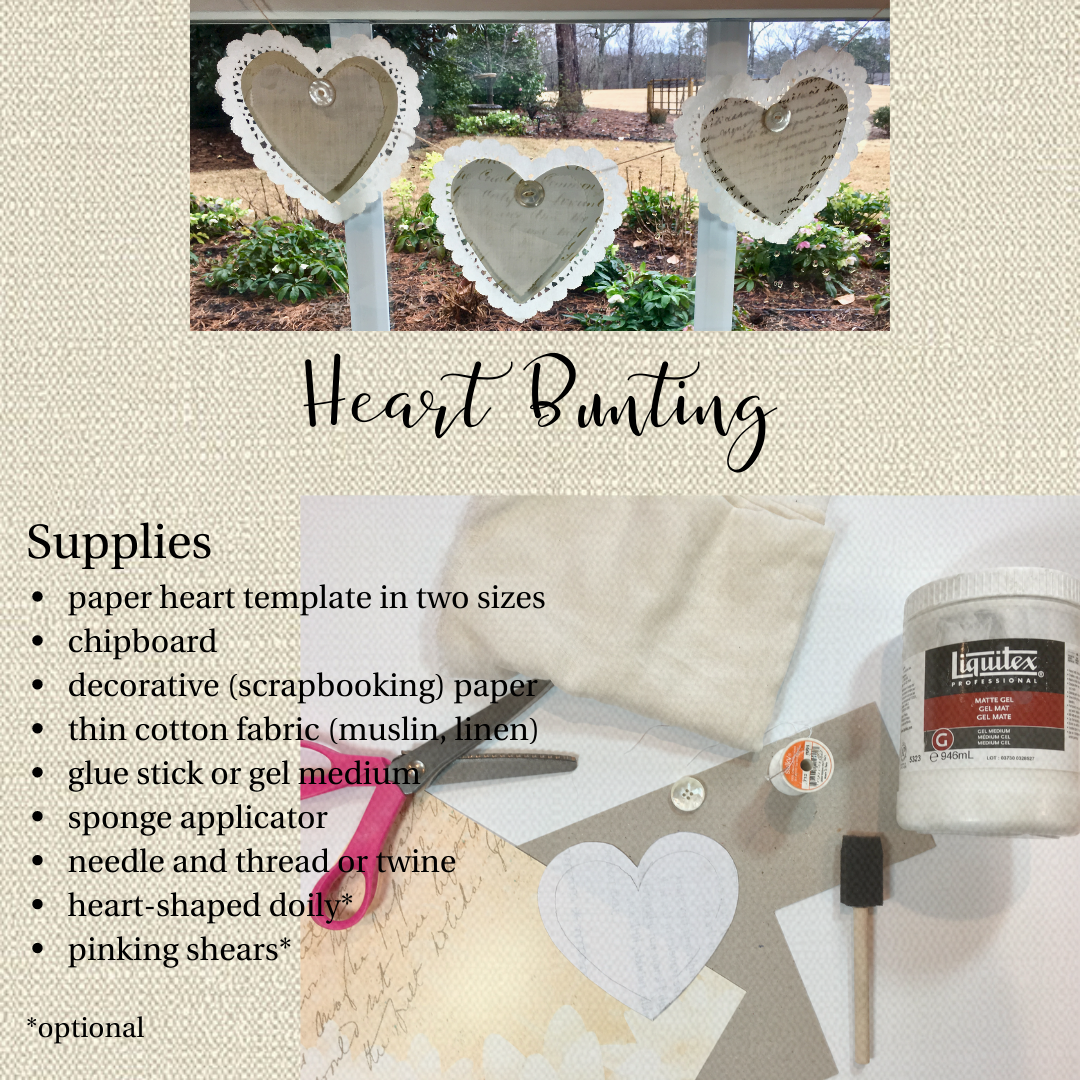
Gather your supplies. If you can find heart-shaped doilies, they’re cute — but not essential. You can use heavy string or thin twine. Twine hangs better but you will need to make sure the eye of your needle is large enough to thread the twine through.
Create heart templates in two sizes, one slightly smaller than the other.
Cut a heart shape from your chipboard using the larger heart template. Using the same template, cut a heart from your decorative paper.
Brush a thin coat of glue on the chipboard heart and lightly press the decorative paper heart on top, lining up the edges. Gently press the two pieces together and wipe excess glue from the sides with a damp paper towel or sponge.
Using the smaller template, cut a heart shape from your fabric. Using pinking shears adds a decorative edge to the fabric, but is optional.
If you are using doilies, glue the chipboard heart to the doily and allow to dry.
Repeat this process for as many hearts as you would like to have in your bunting.
Lay the chipboard hearts in a line and match each with a fabric heart. You may want to use a dab of glue to secure the fabric heart to the paper heart.
Place a button at the top of each heart, in the crevice. Push the needle from the back of your first heart through one hole of the button. Draw the thread and needle through the other hole to the backside of the heart. Repeat this process using the same long piece of thread or twine for each heart. (See tip below. ) Leave enough of a thread or twine “tail” at the start and end of your bunting to use for hanging.


We all have things we say we love, that we’d love to be better at, but what’s the proof of true love? Being willing to practice — to stumble through lots and lots of imperfect before we get even close to something like what attracted us to the activity in the first place.
If you follow me on my “artlife” Instagram account, you’ve probably noticed that I’ve been posting more frequently. I’m participating in a 20-day creative challenge started by artist Michelle Wooderson. The idea is that for 20 days, beginning on January 20th, participants work on one creative endeavor for at least 20 minutes — and then post their work on Instagram. I decided to sketch because I need to improve my drawing skills. I haven’t done it every single day, and I don’t always post what I do, but most days over the past few weeks I have sat down and sketched. It has been so beneficial! I’m getting reacquainted with some principles of drawing that I’ve learned, and forgotten, repeatedly, over the years. Sketching has been an excellent warm up exercise for the watercolor paintings I’ve been working on. It’s been emotionally nourishing to connect with other people doing the same thing. And most importantly, it’s reminded me that a regular habit of working is the only way to see progress — making art is a practice.
Next week I hope to finish up a couple of “Sanibel” projects and will probably spend at least one afternoon making hearts — because it’s February and I love, love, love hearts. On the blog next Friday — Valentines Day, I’ll share some of the many ways to make Heart Art and a couple of simple DIY projects that are especially appropriate for this month, but actually cute for anytime. Then it’s on to the next big theme and another great love — doggies. For about five (?) years, maybe more, I’ve been collecting small ceramic dog figurines that were made in Japan in the 1940’s and 50’s. I’ve had a pretty clear idea of what I want to do with them for awhile, but have never really started putting things together until now. I’ll show you that work in progress, and the little doggies that inspired this collection on the blog on February 28th.
The Doggies Collection will be small assemblages, so they won’t require drawing or much painting. But I really want to keep up the momentum I’ve gained in watercolor and sketching since the New Year. So I’m committing to keeping up a regular sketching practice. Even 20 minute intervals three or four days a week will get me further than just thinking about how I need to improve my drawing skills. Hold me to it — follow along on Instagram @rebeccadegroodt.artlife where I will post pages from my sketchbook (at least a few times a month).
What about you, is there something you would love to get better at — enough to give it 20 minutes a day, a few days a week?

When I’m on the beach, anything feels possible. There’s something about all that vast expanse of open space and air, the bright light and the shifting shades of blue that seems to open the heart and the mind to life. We humans are drawn to the ocean and we seek to represent its beauty and rekindle the feelings of wonder and expansiveness it evokes in our art and decor. This is part of the appeal of shells and shellwork — they’re lovely little objects on their own, and they can’t help but remind us of the ocean’s magic.
Idea Debt
Every time I pick up a pretty bit from the beach, I have a project in mind. And here’s where I run into a problem — I have a lot of shells which means I have a lot of undone projects drifting around in my head. Have you ever heard of “idea debt”? I first came across the concept in the book Growing Gills by Jessica Abel. Jesica explains how having a whole bunch of ideas “swimming around in the brain” can cause an undercurrent of anxiety because at all times, some part of the brain has to be devoted to processing them.
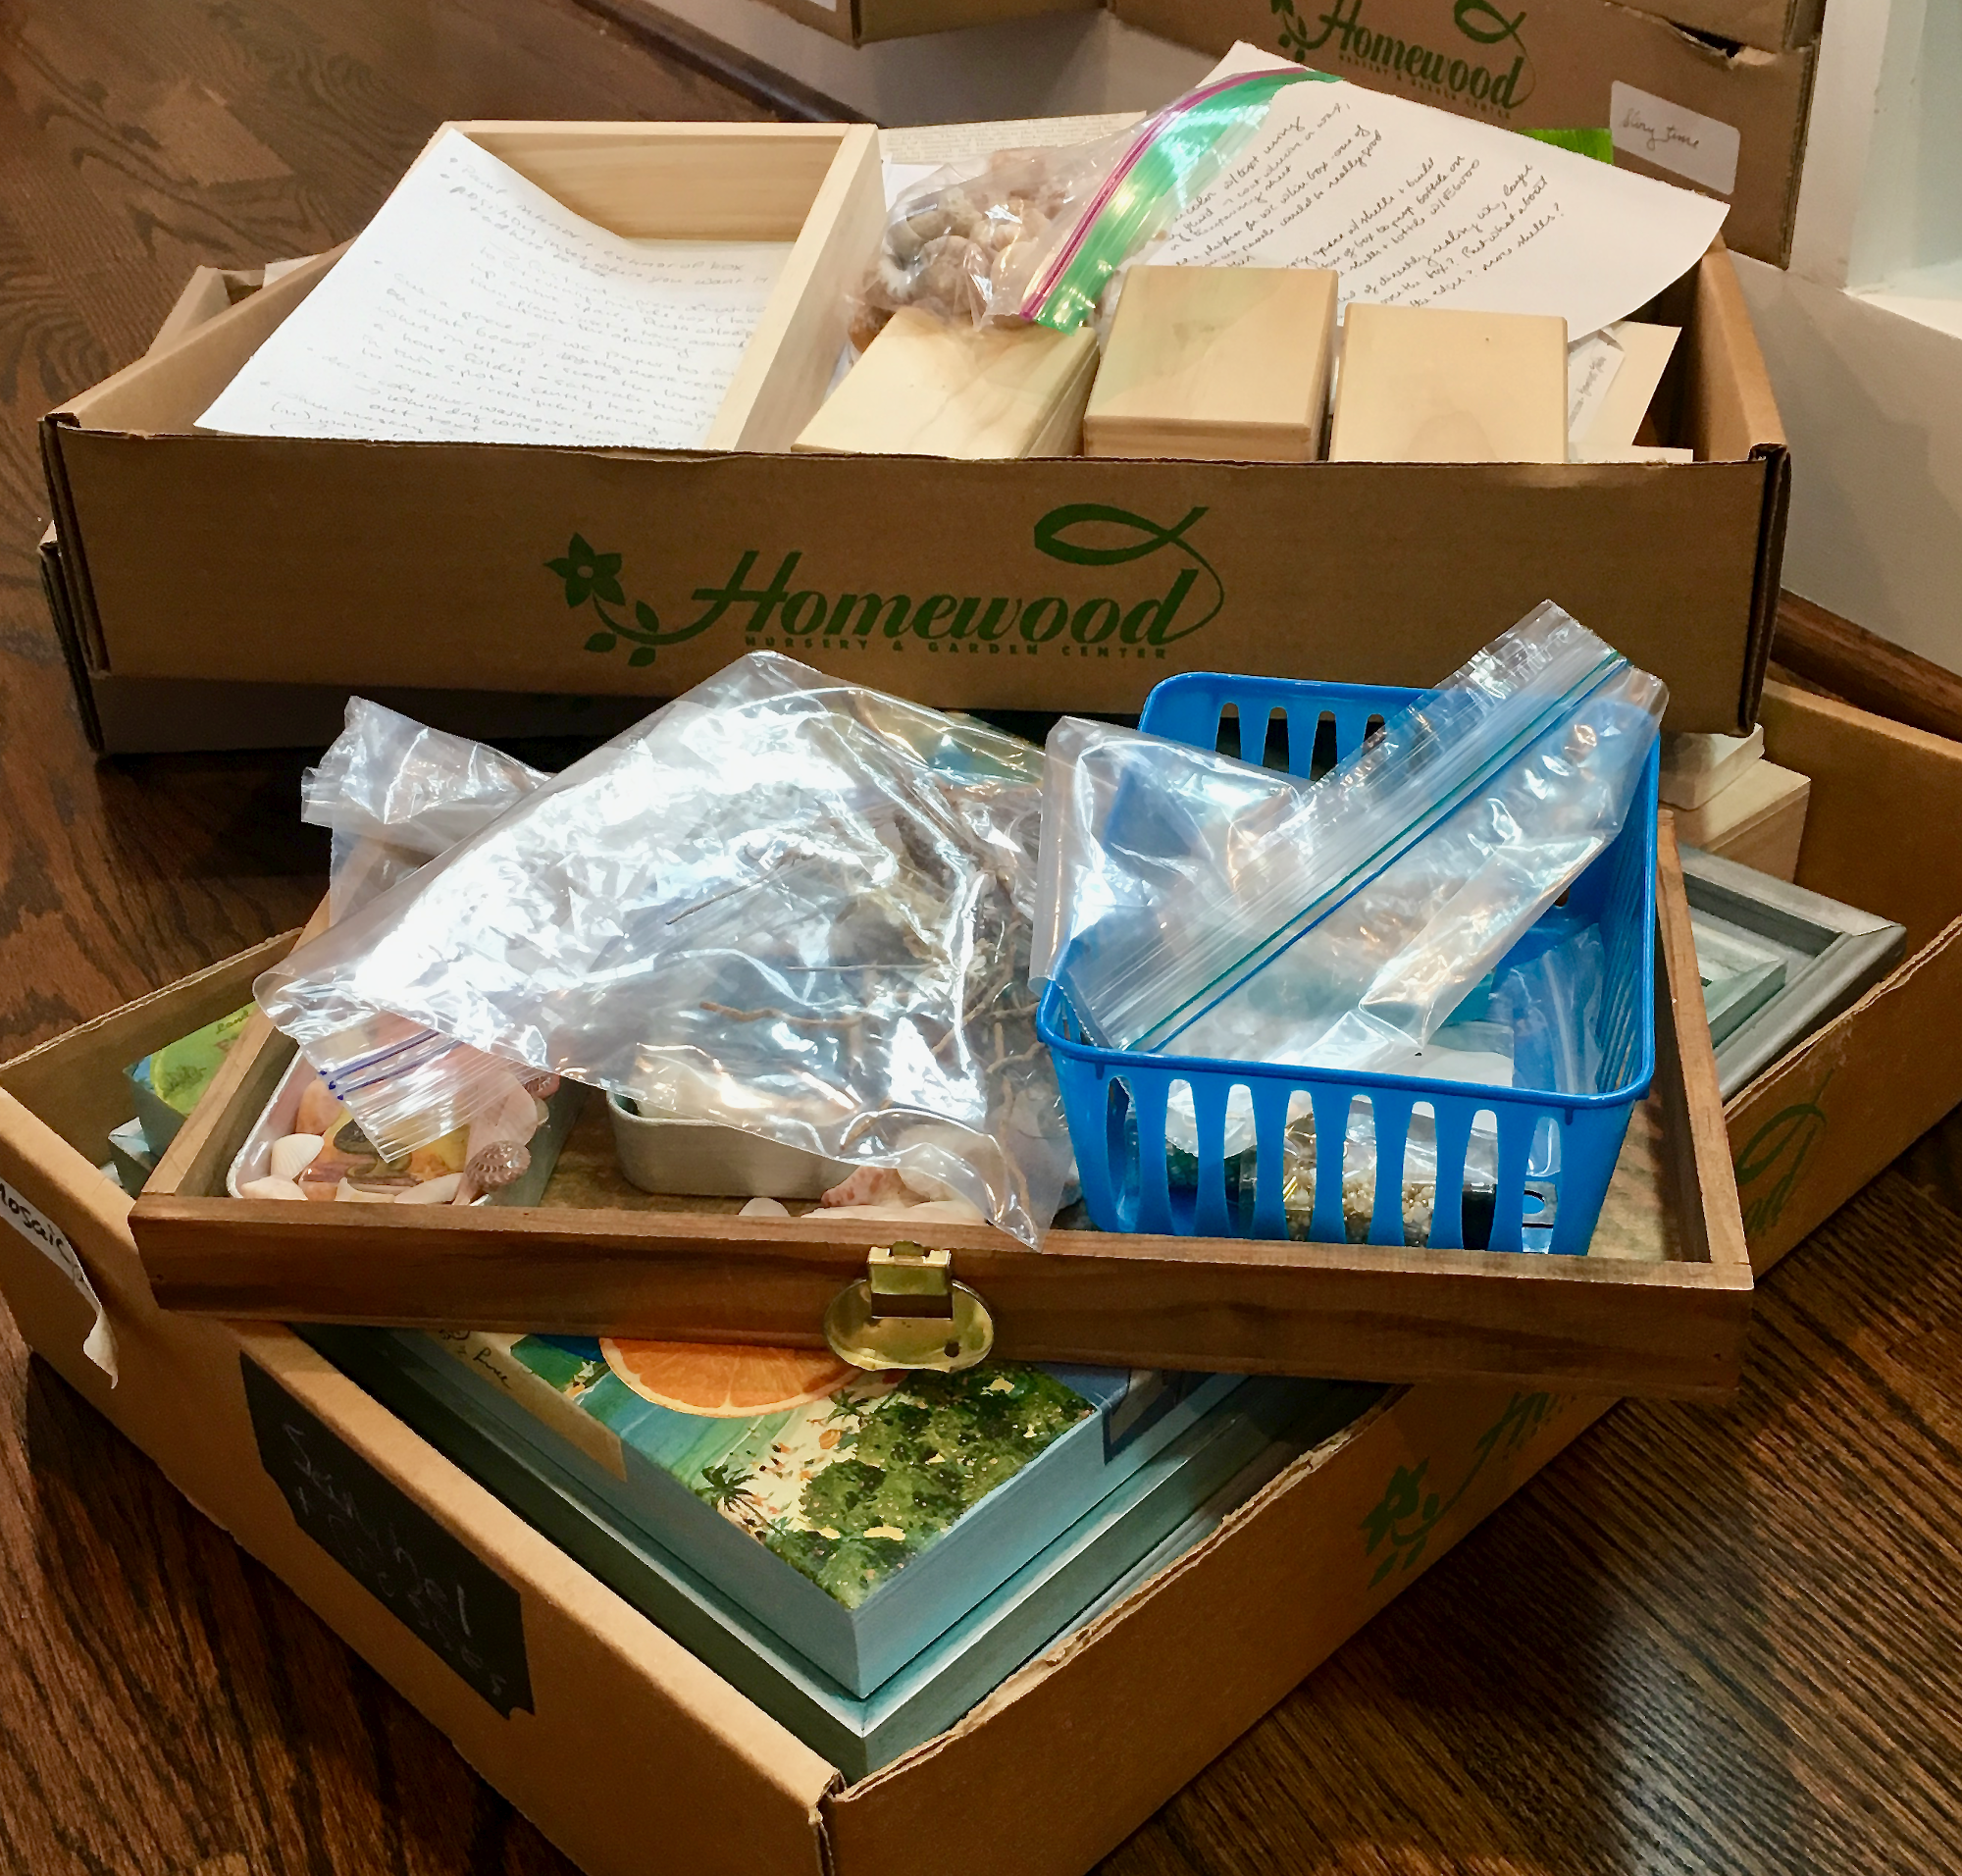
I have shelves full of idea debt. For the past decade (?) inspiration has haunted me and I’ve been gathering up the things she points out on the beach, at antique malls, from paper stores, etc. and stuffing them in cardboard garden-center plant trays. As I said in the January newsletter, my mission in 2020 is to work through, theme by theme, some of the deepest piles of idea debt. Which brings us back to the “Sanibel Collection”. These are the projects I’m currently working on, the plan is to have them done sometime in February.

I’m not even sure when I started these small assemblages made from Altoids tins. The “Neptune’s Castle” picture was part of an advent calendar, and the tiny vintage postcard print? I’m not really sure where I got that. I was intrigued by jewelry made with an image encased in resin and I had the idea to set the resin-covered images among shellwork. At one point I think I was calling them “Mermaid Windows”, but I don’t think I’ll stick with that title. They’re meant to go under a glass cloche, or they could stand on their own. I came so close to completing them! I’m not sure why I shelved them, but the only things left to do are to finish the shell frames around the mouths of the tin and mount them on a shell and rock base. It may be that last step that side-tracked me, not sure exactly how that’s going to happen.
Finishing the shell frames will be easy; here’s a tip on gluing shells to a base:

I think I need a new glue gun.

Prepped substrates and a “practice” watercolor
Next up: lettering, watercolor and shells. There are so many fantastic sayings about the sea. Even a single word — I once did a lovely little shadowbox that featured the word “Persevere”, can be evocative when placed among shells. (No picture of that piece, unfortunately.) There are two, possibly three, quotes that I want to place on a watercolor background set among shells. I have the bases ready and painted, from a while ago. At the time I painted the substrates, I also tried a watercolor with lettering (in photo to right) but was not happy with the results. The project went back on the shelf. This time I’m going to try a slightly different format for the quotes but still surround them with shells.
Here are two techniques for filling in a large area with shells:

I’m also working on some beach-themed art cards. I’m (going to be) painting small, almost abstract watercolors of the water. The paintings will be paired with a strip of fabric collage suggesting the beach.
I save ziplock bags full of bits and scraps of lace and fabric just for collage. The fabric collage strips are in progress, as shown in the photo of my worktable on the left. I love to work on cards because they’re small and quickly completed, allowing for lots of experimentation with techniques and mediums.
One last project to share, and this one is actually completed. It simply required several coats of varnish, and a label and hanging mechanism on the back, and it was done. Sunshine State doesn’t include shellwork but it is all about the beach. I had an incentive to finish this one — it’s headed to Florida to be in the silent auction at the Rotary Sanibel Arts and Crafts fair over President’s Day weekend.
I hope it reminds someone of exactly what they love about the beach.

Sunshine State, mixed media collage on 12x12 wood artist’s panel
Do you find it hard to walk across a beach and not look for shells? I do. They are so alluring with their soft colors and curving shapes — little bits of sculpture that the sea just tosses nonchalantly up on the shore.

Souvenir shell box from the late 19th or early 20th century that (I believe) belonged to my great grandmother.
Since before our girls were born we have spent many if not most of our vacations on Sanibel Island, FL. Sanibel is famous for its amazing shells. The way shells collect on the beaches has something to do with how the island is positioned— like a boomerang, off the south west coast of Florida. While I’m not totally clear on the oceanography behind it, the gulf waters spit up shells by the bucketful on Sanibel’s beaches and shelling is a very popular activity. I’m kind of obsessed; I sometimes have to forcefully remind myself to look at the beautiful water, the sky . . . but it’s so meditative to gather shells. Each little gem I pick up, from the teeny, tiny perfect Murex to the random rectangular fragment with edges worn as smooth as glass — tells me something about what it could be.

The pieces in the photo collage above are examples of Victorian and early 20th century shellwork. It’s interesting to me that my great grandmother had one of these souvenir boxes — very similar to the ebay listings shown in the bottom left corner of the collage. Where did this wife of a small-time farmer in southern Indiana get one of these? I can’t imagine she ever took a sea-side vacation; maybe someone brought it to her.

Shells make intriguing frames for photos, prints and mirrors, particularly if the pictures are nautical-themed. The antique example here (bottom) features a print of a ship. I made a piece with a similar look (top) for a sea-themed mantel arrangement. I cut a picture from an old art book and adhered it to canvas board, then glued the shells directly on the print. I used a dark glaze to give the piece an aged look.
It seems we have always felt drawn to shells, given that shells have been used to decorate people, objects and spaces since ancient times. Increasing openness to scientific curiosity led to shell collecting becoming popular among the aristocracy in the 16th century; by the 17th and 18th century the swirling lines and curves of the popular Rococo style made shells one of the most common decorative motifs. Everything from tables and chandeliers to the walls of elaborate grottos and follies got the shell treatment. The sailors manning ships on the trade routes of the early 19th century bought shell-encrusted boxes and pictures in the Caribbean and took them home as gifts to their sweethearts. These souvenirs, often heart-shaped or featuring heart-shaped designs, came to be known as Sailor’s Valentines. By the second half of the 19th century, better transportation created more opportunities for the average person to travel, and a very large market for souvenir sellers. In the late Victorian era shellwork boxes, frames and “valentines” were made in large numbers — both for the souvenir trade and by ladies who found that covering small boxes, bottles, and such with artistic arrangements of shells made a satisfying pastime.
If you’d like to see more examples of shell art, decorating and craft ideas, check out my Shellwork Pinterest board. For lots of information and inspiration, Shell Chic by Marlene Hurley Marshall is a gorgeous coffee-table book covering both history of the craft and how to’s for simple to complex projects.

There are artists today making traditional Sailor’s Valentines, which typically consists of a very precise, detailed design within a hinged wooden box. They are particularly popular in New England, where artists often use nautical-themed scrimshaw on ivory as the focal point of their design. Many of these artists exhibit and compete at the annual Sanibel Shell Show.

So I’m in good company in my shell obsession. I think about this when I find I’ve spent an hour or more on the beach with my eyes cast down searching for an irresistible glimmer in the sand. But here in Raleigh, I need to get going on actually producing some of the many projects I dreamed up on the beach. I feel like I owe it to the shells.
I was so pleased to get my latest copy of Somerset Studio magazine and see that they included my submission for their “artwork incorporating stitching” theme in the Spring issue.


Finally. It has taken a very long time — ok years, of thinking about it and taking micro-baby steps (ie: setting up an account on Etsy for a shop but never actually opening it) to get it going. I could probably write a book on why that is, with multiple chapters devoted to procrastination techniques. Sometimes the idea looms so large that it keeps you from seeing what lies beyond it. In this case — filling in a few fields on Etsy’s start up page, uploading some pictures and entering some more data, and there you have it: a little shop on Etsy. Not so massive after all. And although there is a bit of a learning curve, it’s definitely a learn by doing kind of thing. If I’m actually taking and editing photos and implementing SEO techniques regularly, I’m sure my skills will improve more than if I’m just reading about other people doing it. So that’s enough looking in the rearview window, now I’m focused on moving forward and glad that the journey has finally begun.

Oh and the name . . . all that time I was thinking about a shop I never really settled on a name. I just figured I’d call it “RebeccaDeGroodtArt” or something similar. Not very imaginative but to the point. Some of the Etsy “gurus” are pretty adamant about a shop having its own clever little name, but I couldn’t think of anything. And I was wary of limiting what I could list in the shop based on the name. Yes I make art, but it tends toward smaller pieces, perfect for gifting but not so much for holding their own above the couch. I also make cards, Christmas ornaments, little books, upcycled small furnishings . . . This summer and fall as I started fine tuning the website and actively blogging I got a little more clarity on my own tendencies. I like to make all kinds of things and I’m often inspired by random things I find. I need a shop because I have a persistent muse and an avid inner magpie constantly egging each other on — so there’s a name. And it’s a name that’s not too specific about what’s in the shop, giving the muse and the magpie a little room for wandering.
Visit the new shop at themuseandthemagpie.etsy.com

